Creating a Sigmafine Model
A Sigmafine Model can be created, modified and edited in the System Explorer.
Creating a Model in System Explorer
To create a new Sigmafine model:
Open the System Explorer.
In the navigation pane, click on Sigmafine Analysis.
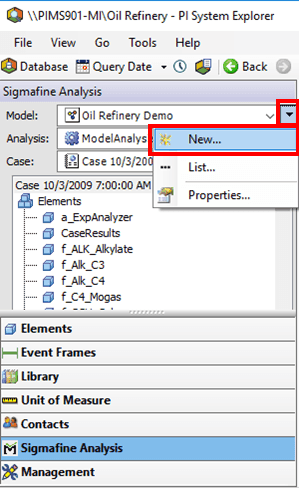
Click the Model down-arrow and select New.
The Choose Model Template window opens.

Click OK to create the new model.
System Explorer creates the Model and assigns it a default name in the Model Properties window.

Click on the General tab is not already selected.
In the Name box, change the default name as needed.
In the Description box, type a short description of the new model.
To make the Model available to all Sigmafine users, click the
 Check In button.
The changes are saved and you are returned to the System Explorer window in which the new Model is displayed.
Models can also contain layers that can be used to group elements for display and analysis.
(Optional) Use the steps under Adding Layers to a Model to create one or more layers for your model.
Adding Layers to a Model
In System Explorer, open the Model to which you want to add layers.
If you have just created and checked-in the model, it is already open in the System Explorer window.
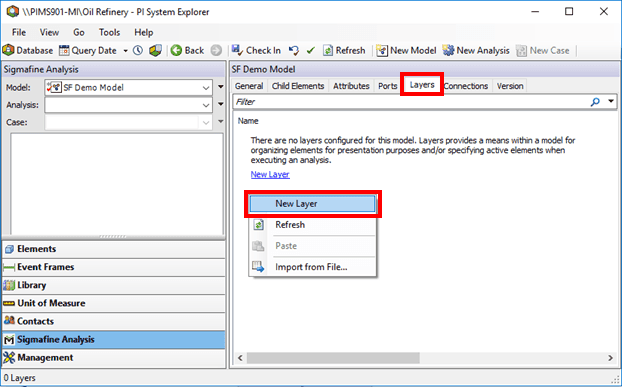
In the pane on the right, click the Layers tab.
Right-click in the right pane and select New Layer from the pop-up menu (as shown in Figure 144).
System Explorer creates the layer and assigns it a default name in the Layer Properties window.

In the Name box, change the default name.
In the Description box, type a short description for the new layer.
Click OK to save the layer to the Model and close the Layer Properties window.